Bored Cook In The Kitchen

Tried and true recipes, new twists on old favorites, and new dishes to expand my family's palate.

Tag Archives: olive oil

Mussels In Spicy Tomato Sauce

I’m going to share something weird about myself with you today.  There are many weird things about myself, so this is really just one of them. I hate clams.  Don’t even eat an oyster in front of me.  Blech!

But, I LOVE mussels, and this is my most favorite way to eat them.  Simmered in some butter, wine and garlic isn’t bad either, but in a spicy tomato sauce will always be my first choice.

We made a large bowl of these and sat out on the deck just picking them clean. Delish!

MUSSELS IN SPICY TOMATO SAUCE:

  • 2 lbs. Cleaned Live Mussels **See below how to clean mussels
  • 1 – 24 oz. Can Crushed Tomatoes
  • 1/2 Cup Dry White Wine
  • 1 Small Onion, chopped
  • 4 Cloves Fresh Garlic, minced
  • 10 – 12 Fresh Basil Leaves, chopped
  • 1 tsp. Fresh Oregano, chopped
  • 2 Tbsp. Olive Oil
  • 2 tsp. Crushed Red Pepper Flakes
  • Salt, to taste

Begin the tomato sauce in a large skillet.  Add the oil, onion and garlic and sauté until just before the garlic begins to brown.

Add the wine and mix well, scraping up the bottom of the pan. 

Add the crushed tomatoes, red pepper flakes, oregano and salt to taste.  Stir well, place on simmer and cover, stirring occasionally so you don’t burn the bottom of the sauce.

Go through the bag of mussels and discard any mussels that have cracked and broken shells.  If you have any mussels that are slightly open, don’t discard them right away by assuming they are dead.  Tap the mussel several times.  If it’s still alive it will close immediately.  If it doesn’t close after a few taps, discard the mussel since it’s no longer alive.

In a large bowl filled with cold water (I actually use 1/2 of my double-sided sink), cover the mussels with cold water and allow to soak for about 15 to 20 minutes.  Drain the mussels and remove the beards. The beard is a tough stringy substance stuck on the outside of some of the mussels. Grasp the edge of the beard and pull down firmly towards the hinge of the mussel and remove.

Scrub the outside of each mussel with a hard brush to remove any debris or barnacles on the outside of each shell.  Place in a colander and give them a final rinse under cold water and set to the side for a few minutes.

Add your fresh basil to the tomato sauce, stir well, and prepare to add your mussels.  Add all the mussels to the tomato sauce, stir gently and cover immediately.  Keep covered for 3 minutes.  Remove the cover, give another gentle stir, cover and allow to cook for an extra 3 to 4 minutes.  You don’t want to over cook these for any longer than a total of 7 minutes or the muscles will turn tough and chewy. 

Once done, remove any mussels that did not open and discard.  Take the remaining mussels and gently spoon them into a large dish and cover with sauce.  Serve with some sliced lemon for squeezing, sit back and enjoy.

Make sure to use that crusty Italian bread to soak up all that delicious sauce.

You could always serve these over some cooked spaghetti, but I prefer them just the way they are.


Sausage & Chicken Bake

The other day I decided to switch up my Sausage and Potatoes dish with a new twist.  I had some boneless chicken breasts waiting to be used and thought about what I could make with them.

I threw them all together with the sausage, potatoes, onions, and then added some roasted red peppers to the mix.  The final result was something my family truly enjoyed and a definite keeper.

Here is how to make it.

SAUSAGE & CHICKEN BAKE:

  • 8 Sweet or Hot Italian Sausage
  • 3 Boneless Chicken Breasts
  • 5 – 6 Red Potatoes
  • 1 Large Sweet Onion, cut into large pieces
  • 1 – 12 oz. Jar Roasted Red Peppers, with the juice
  • 3 Cloves Garlic, chopped
  • 2 – 3 Tbsp. Olive Oil
  • 2 tsp. Dried Basil
  • Salt & Pepper, to taste

 You will want to start the recipe a few hours before you are ready to bake it.  Overnight would work too. 

Begin cutting up the chicken breasts into equal bite size pieces.  Place the chicken in a large Ziploc bag.  Slice the roasted red peppers into strips and add this to the chicken.  To the chicken peppers, add olive oil, garlic, onion, basil and the roasted red peppers.  Allow to marinate for a minimum of 3 hours, or overnight.

When you are ready to bake, heat the oven to 350 degrees.  Leaving the skin on, cut each potato into equal size pieces and add to a large bowl and add salt and pepper to taste. 

Cut each sausage link into 3 pieces and add it to the potatoes.  Dump in the entire contents of the chicken mixture to the potatoes and sausage and mix well. 

Add the entire mixture to a 13″ x 9″ baking dish and cover with foil.  Bake for one hour.  After an hour, turn the oven to 400 degrees and remove the foil.  Allow to continue cooking, stirring occasionally, until the sausage browns somewhat. 

Once done, remove from oven and enjoy.  

Sicilian Pot Roast

They had rump roast on sale last week and I picked one up undecided what I wanted to do with it.  While I was searching through some recipes over at Tasty Kitchen, I came across one that had received all positive reviews and looked delicious, so I gave it a try.

It’s different than the typical pot roast I make with potatoes, carrots and onion.  I was looking for something different so this worked out perfectly.

The tomato and garlic really does something different to this dish in a very good way.  The meat was fork tender and the sauce was tangy and filled with garlic.  I added some thyme and rosemary to the dish, which the original recipe did not call for, but it turned out wonderfully.  Other than that, I kept the recipe the same way.

Here is the link to the recipe Sicilian-Style Pot Roast if you want to give this a try.  I highly recommend it!

I served this with some Roasted Potatoes
and asparagus.  It was a perfect Sunday dinner.

Enjoy!

Sauteed Asparagus


If I had to pick a favorite vegetable it would easily be asparagus.  I can eat them roasted, steamed, naked or raw.  Surprisingly, my oldest son likes them also, but not surprisingly, both of my younger children won’t come near them.  My husband, who refuses to eat anything green, won’t come near these either. 

I love roasting them in the oven mixed with some garlic, olive oil, salt and pepper.  But another way I love them is quickly sautéed on the stove with some butter, olive oil, fresh garlic and soy sauce.  They take just a few minutes to cook up and they are absolutely delicious.

Sautéed Asparagus:

  • 1 Bunch Fresh Asparagus
  • 1 Clove Garlic, finely minced
  • 1 Tbsp. Butter
  • 1 tsp. Olive Oil
  • 1 tsp. Reduced Sodium Soy Sauce
  • Salt and Pepper, to taste

Wash and dry asparagus.  Either snap off the ends or cut them, whichever you prefer.  Then cut them on the diagonal and set to the side.

In a large saute pan, heat up the butter and olive oil and dump in the garlic.  Saute the garlic until soft, watching to make sure you don’t burn it.

Throw in the asparagus and the salt and pepper. Saute for a minute or two and then add the soy sauce.  Saute for a few minutes longer making sure not to over cook.  The asparagus should still be crisp, and total cooking time should be between 3 and 5 minutes.

Transfer to a serving bowl and enjoy!

Add to FacebookAdd to DiggAdd to Del.icio.usAdd to StumbleuponAdd to RedditAdd to BlinklistAdd to TwitterAdd to TechnoratiAdd to Yahoo BuzzAdd to Newsvine

Grilled Pizza

My mouth has been watering for a week for this grilled pizza.  My plan was to make these last weekend, but then we got hit with cold, rainy, damp weather, so I nixed the idea.

But this weekend it’s beautiful, hot, sunny and gorgeous out.  The perfect time to grill up some pizzas.

Our favorite pizza place serves what they call a “Bruschetta Pie”.  No sauce, but lots of Roma tomatoes, fresh basil, fresh garlic, fresh mozzarella, and oil and vinegar.  It’s delicious.  We order it every few weeks.

As you all may know by now, I’m not a dough person.  I can’t get the hang of it and keep promising myself someday I’m going to become one of those people who just has magical fingers that works dough – any kind of dough – beautifully. 

Until I get there, I buy my pizza dough.  Our store had fresh pizza dough on sale last week for $1 for a fresh made pound.  I picked up a few, and after realizing last weekend was a no go on the grilling decided instead to throw them in the freezer for another time.  This was that time. 

First things first, either make your own dough or pick up some freshly made dough.  Pizza places will sometimes sell you theirs, but there are many grocery stores that make their own now as well.  I don’t recommend the canned stuff.  It’s just not natural.

Let that dough rise and do its thing. 

Get your grill nice and hot, and before you heat it, either spray it with some grilling spray (I used Pam for Grilling), or brush it with some olive oil.

While the grill is heating, slice up the tomatoes, basil, chopped garlic, and throw it all in a bowl.  Drizzle with some olive oil, salt, pepper, and balsamic vinegar.  You can add any other spices you want.  Some italian blend seasoning would be great as well, along with some grated parmesan.

Work your dough out into the shape you prefer.  I made two pizzas out of the 1 pound ball I purchased, sliced it in half and stretched it out. I’m not particular about the shape, and in fact, I kind of like it to be a little out of shape. 

Once the grill is nice and hot (mine was at around 375) I placed the dough down.  Let it grill on one side before you add your toppings and get it nice, brown and crispy.

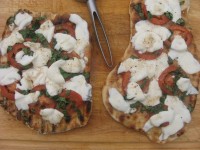
Now, on the side you just grilled it on, top it with your tomatoes, basil, garlic and the sliced mozzarella.  Sprinkle a little of the balsamic vinegar over the top and close the top of the grill.

Check it every few minutes, and make sure to peek underneath to make sure it’s not browning too much.  If you have hot spots on your grill, you may need to move the dough around to make sure it grills evenly.

Once it’s nice and crisp on the bottom, shut off the grill, close the top and let it sit for a few minutes for the cheese to really melt.  Take off the grill, cut that puppy up and gobble it down! 

I won’t embarrass myself and tell you how many pieces I ate.  I’ll just tell you it was D.E.L.I.C.I.O.U.S

Grilled Pizza:

Serves 4

  • 1 lb. Pizza Dough (freshly made or store bought)
  • 2 Large Roma Tomatoes, Sliced
  • 10 Basil Leaves, Sliced
  • 1-2 Cloves Garlic, Chopped
  • 8 0z. Ball Fresh Mozzarella
  • Salt & Pepper to taste
  • 2 tbsp. Olive Oil (I used light tasting)
  • 1 tbsp. Balsamic Vinegar
  • 1/2 tsp. Dried Italian Seasoning (optional)

Begin by either spraying your grill with a non-stick grill spray, or brush it with some olive oil. 

Turn on the grill and get it heated to around 375/400 degrees.

While the grill is heating, add your sliced tomatoes, basil, olive oil, vinegar, salt, pepper, garlic and spices to a large bowl, mix it well, and set to the side.

Take your dough and cut it in half.  Work each half into the desired shape and thickness you prefer.

Position both pieces of dough on the grill and allow to get crispy and brown on one side.  Move the dough around if necessary if you have hot spots on your grill so it will brown evenly without burning.

Once the dough is done on one side, flip it over and lay out your tomato mixture, place the slice mozzarella on the top and drizzle with a little of the oil and vinegar left in the bowl.

Grill until crispy.  Once done, turn off the grill, and close the top.  Allow the pizzas to sit for a few minutes in the warm grill to get the cheese nice and melted.

Remove, slice and serve immediately.

Enjoy!