Bored Cook In The Kitchen

Tried and true recipes, new twists on old favorites, and new dishes to expand my family's palate.

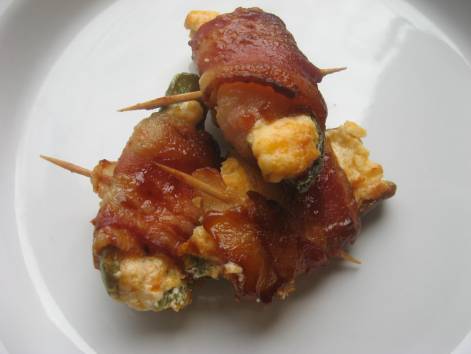
BBQ Jalapeno Poppers

As you can see, it’s been a long time since my last post.  Summer was a crazy whirlwind that just flew by for me and now we are almost at the end of September!  Life just got in the way of my postings here.  Thank you to all of you who emailed me to ask if everything was okay.  I’m back to share some delicious recipes with you.

I’ll start by sharing one I know many of you have tried.  If you haven’t tried them, you must!  I’ve seen a number of recipes for these online and I actually have a traditional version of these Jalapeno Poppers I normally make.  The ones that you deep fry.  They are to die for as well, but I’ll share those with you on another day. 

This version I used was from Ree Drummond’s book The Pioneer Woman Cooks.  I looked at them so many times and finally this summer I made them for the first time.  Ree is not lying when she tells you how addictive these things are.  I’ve made them several times since, and most recently to use up all the peppers I had overflowing my plants in the garden. 

BBQ JALAPENO POPPERS

Recipe from The Pioneer Woman Cooks by Ree Drummond

  • 18 Fresh Jalapenos
  • 1 – 8 oz. Package Cream Cheese, room temperature
  • 1/2 Cup Grated Cheddar Cheese ( I grated mine finely and probably used about 3/4 cup)
  • Green Onion, sliced (I omitted this)
  • 18 Slices Thin Bacon, cut into halves
  • Bottled Barbecue Sauce
  • 36 Toothpicks
  • **Rubber Gloves for working with peppers

**The reason I put those two ** next to “wearing gloves while working with the peppers” is because I’ve seen many people suggest this when working with hot peppers.  I have never had a problem using bare hands when cutting up hot peppers.  However, I’m probably just not sensitive to them as some people are, so if you aren’t sure or if you know you are sensitive to them, take the advice and use the rubber gloves.

Preheat oven to 300 degrees.  (Ree’s recipe suggests 275 degrees, but I found that to not work for me.)

Wash and dry the peppers and cut into halves.  I cut off the stems as well, but you can leave them on.

With a spoon, scrape out the seeds and membrane from each pepper and throw away.

In a mixing bowl with an electric mixer, mix together the cream cheese, cheddar cheese and the green onions if you are using them.

Fill each pepper half with the cheese mixture and set to the side.

Take a piece of bacon and wrap it around each pepper.  Secure with a toothpick.

Brush each pepper with some barbecue sauce.

I place these on a baking rack and cover the sheet pan the baking rack sits in with aluminum foil.  This way when the bacon fat drips you won’t be scrubbing it off the bottom pan.  Just throw away the foil and your job is done.

Bake for about 35 to 45 minutes. 

Remove from oven, allow to cool slightly and serve. 

I promise you that Ree is right.  There is no way you can stop eating these things!

Enjoy!


Rainbow Chicken Roll

Chicken is a popular dish in our home and I’m always looking for new ways to make it.

  I was watching Sandra Lee’s Semi-Homemade Cooking the other day when she prepared this dish.  It looked simple and delicious and I decided to give it a try.  One thing that intrigued me about this dish was that it was something I could throw together early in the day, refrigerate and then pop in the oven just before I was ready to start dinner.  I love dishes like that!

I followed the recipe except for one small change.  Sandra’s recipe called for the addition of green beans.  Since there are fewer people in the family that like green beans I opted to switch out the green beans for chopped fresh broccoli instead.  It worked out perfectly.

RAINBOW CHICKEN ROLL

Recipe from Sandra Lee’s Semi-Homemade Cooking

  • 4 Boneless, Skinless Chicken Breasts
  • 1 tsp. Seasoned Salt
  • 1 tsp. Salt-Free Italian Seasoning
  • 8 to 10 String Beans (*I used about 1/2 – 3/4 cup fresh chopped broccoli)
  • 1 Small Carrot, julienned
  • 1 Red Pepper, julienned (*I used a small red pepper & had some left over)
  • 1/2 Cup Shredded Mozzarella
  • 2 Cups Marinara Sauce (*You can used jarred or homemade)

Preheat oven to 350 degrees.

Trim chicken breasts of any fat.  Lay flat on a cutting board and butterfly each breast 3/4 of the way through.  Lay each chicken breast on a cutting board, cover with a piece of plastic wrap, and pound to 1/4″ thickness.

Lay chicken breasts flat on a cutting board and sprinkle with seasoned salt and Italian seasoning. Place 3 to 4 strips each of the string beans, carrots and red pepper leaving 1/2-inch on the side furthest from you. Sprinkle each with 2 tablespoons cheese.  Roll chicken breast up and place seam side down in a medium baking dish.

Pour marinara sauce over chicken and place in oven. Bake 30 minutes basting with the marinara sauce halfway through cooking.

Remove breasts from pan. To serve slice each breast into 4 or 5 slices and fan on the plate with additional marinara sauce on the side.

**Note:  I did this early in the day, covered and refrigerated the dish, and then took it out when I was getting ready to start making dinner, preheated the oven and baked it. 

And additional note:  this dish took just slightly over one hour to cook in a covered casserole dish, so I would adjust the cooking time from the original recipe provided.

Enjoy!

Sausage & Pepper Pizza

The other night I was trying to decide what to make for dinner and thought about making up some Sausage and Pepper’s.  Then I thought about having some pizza instead.  That was when I realized I would just combine the two. 

In the past when I’ve used pizza crust, I’ve told you that I purchase the dough either from the store or one of our local pizza places.  I’m not one of those people who has the talent for bread and dough making.  And, I do believe it’s a talent that some people just seem to have. 

Finally, I decided to try my hand at my own pizza dough, and after making batch after batch of it, I won’t ever be buying a store bought dough again.  Well, actually, that isn’t true.  If it’s on sale or if I’m in a rush I would still buy the store made version.  But, I will admit that working with freshly prepared pizza dough was a wonderful experience.

Here is how I made just one of my most favorite pizza versions.

PIZZA DOUGH:

Pizza Dough recipe from Family Circle  Magazine 10/17/10 issue

  • 1 Cup Warm Water
  • 1 Packet Active Dry Yeast (* I used Freischmann’s Pizza Dough Yeast)
  • 2 3/4 Cups All Purpose Flour
  • 1 tsp. Sugar
  • 1 tsp. Salt (I used Kosher, so I added a little extra)
  • 2 Tbsp. Olive Oil

Place water in a small bowl and stir in the yeast.  Let stand 5 minutes.

In a large bowl, whisk together 2 1/2 cups of the flour, sugard and salt.  Make a well in the center and add the yeast mixture and olive oil.  Stir until dough comes together and forms a ball.  Tur out onto a well floured surface and knead for 5 minutes, adding as much of the remaining 1/4 clour as needed.  Form into a disk and place in a bowl that has been lightly coated with olive oil.  Turn disk over and cover bowl with plastic wrap.  Allow to rise in a warm place for 2 hours. **SEE NOTE**

**NOTE:  If you find yourself making the dough on a cold day and don’t have a warm spot to place it, this is what I have done and it’s worked well.  I turn the oven to 200 degrees until just heated.  Turn off the oven and wait about 15 minutes.  Then I place the bowl with the dough, which I cover with a clean dish cloth, in the oven and allow to rise.  It will usually rise this way in less than an hour. 

TOPPING INGREDIENTS & INSTRUCTIONS:

  • 1 lb. Sweet or Hot Italian Bulk Sausage
  • 1 Red Bell Pepper, sliced
  • 1 Medium Sweet Onion, sliced
  • 1 1/4 Cups Pizza Sauce (Use your favorite here)
  • 1 1/2 Cups Freshly Grated Mozzarella Cheese (or as much as you and your family prefer)

Preheat oven to 425 degrees.

In a large sauté pan, break up the sausage and brown completely.  This will take about 15 or more minutes.  You want to make sure the sausage is fully cooked and evenly browned. 

Once the sausage is done, remove it to a plate lined with paper towels to absorb any excess oil. 

In the same pan that you just browned the sausage in, add the sliced onions and peppers.  Depending on how lean your sausage is, you may have enough excess grease left in the pan to cook up the onions and peppers.  If you don’t, add 1 or 2 teaspoons of olive oil and sauté the peppers and onions until just soft.

Take your risen dough and form it into whatever shape you prefer.  I did this in a 16″ pizza pan and it came out perfectly. 

Since the toppings are pre-cooked, I decided to pre-bake the crust for a few minutes before adding the toppings. 

Place the dough in the oven and allow to pre-bake for about 6 – 7 minutes.  Remove from the oven and top the crust with the pizza sauce, sausage, peppers, onions and mozzarella cheese. 

Return the pizza to the oven and cook until the top is bubbly, the cheese melted, and the crust is a golden brown.

Sometimes, if I feel like the bottom of the crust is not cooking to the crispness I like, I will slide the pizza off the pizza pan directly on the oven rack half way through the baking process and finish it that way.  If you are using a pizza stone, you won’t need to do this.

Once done, remove from the oven and allow to set for a few minutes.  Slice into 8 equal pieces using a pizza cutter and serve.  Enjoy!

I’ve shared this recipe over at Kim’s blog (Previously known as “Quit Eating Out”) “Recipes to Run On”.  Check out Kim’s site by clicking on the link below and view some other links to some great bloggers.

 

Mussels In Spicy Tomato Sauce

I’m going to share something weird about myself with you today.  There are many weird things about myself, so this is really just one of them. I hate clams.  Don’t even eat an oyster in front of me.  Blech!

But, I LOVE mussels, and this is my most favorite way to eat them.  Simmered in some butter, wine and garlic isn’t bad either, but in a spicy tomato sauce will always be my first choice.

We made a large bowl of these and sat out on the deck just picking them clean. Delish!

MUSSELS IN SPICY TOMATO SAUCE:

  • 2 lbs. Cleaned Live Mussels **See below how to clean mussels
  • 1 – 24 oz. Can Crushed Tomatoes
  • 1/2 Cup Dry White Wine
  • 1 Small Onion, chopped
  • 4 Cloves Fresh Garlic, minced
  • 10 – 12 Fresh Basil Leaves, chopped
  • 1 tsp. Fresh Oregano, chopped
  • 2 Tbsp. Olive Oil
  • 2 tsp. Crushed Red Pepper Flakes
  • Salt, to taste

Begin the tomato sauce in a large skillet.  Add the oil, onion and garlic and sauté until just before the garlic begins to brown.

Add the wine and mix well, scraping up the bottom of the pan. 

Add the crushed tomatoes, red pepper flakes, oregano and salt to taste.  Stir well, place on simmer and cover, stirring occasionally so you don’t burn the bottom of the sauce.

Go through the bag of mussels and discard any mussels that have cracked and broken shells.  If you have any mussels that are slightly open, don’t discard them right away by assuming they are dead.  Tap the mussel several times.  If it’s still alive it will close immediately.  If it doesn’t close after a few taps, discard the mussel since it’s no longer alive.

In a large bowl filled with cold water (I actually use 1/2 of my double-sided sink), cover the mussels with cold water and allow to soak for about 15 to 20 minutes.  Drain the mussels and remove the beards. The beard is a tough stringy substance stuck on the outside of some of the mussels. Grasp the edge of the beard and pull down firmly towards the hinge of the mussel and remove.

Scrub the outside of each mussel with a hard brush to remove any debris or barnacles on the outside of each shell.  Place in a colander and give them a final rinse under cold water and set to the side for a few minutes.

Add your fresh basil to the tomato sauce, stir well, and prepare to add your mussels.  Add all the mussels to the tomato sauce, stir gently and cover immediately.  Keep covered for 3 minutes.  Remove the cover, give another gentle stir, cover and allow to cook for an extra 3 to 4 minutes.  You don’t want to over cook these for any longer than a total of 7 minutes or the muscles will turn tough and chewy. 

Once done, remove any mussels that did not open and discard.  Take the remaining mussels and gently spoon them into a large dish and cover with sauce.  Serve with some sliced lemon for squeezing, sit back and enjoy.

Make sure to use that crusty Italian bread to soak up all that delicious sauce.

You could always serve these over some cooked spaghetti, but I prefer them just the way they are.


Delicious Sticky Chicken

Sometimes I feel overwhelmed by all the fantastic food blogs on the web.  So much talent and so many delicious ideas.  There are some that I visit often, and the blog at Southern Plate has now become a fast favorite. 

If you are not familiar with this blog you need to visit it soon.  It’s run by Christy Jordan the author of The Southern Plate.  It’s a blog filled with great family recipes, followed up with some great family values and memories. 

The recipe I’m sharing with you today I saw at Christy’s blog and knew I had to try it.  It has a total of four ingredients and just looked too simple to pass up.  It’s easy and delicious and has quickly become a family favorite.  There were no complaints on our dinner table the night I served this.

You can find the recipe here .  Christy calls these “Grilled Chicken Tenderloin – Without the Grilling.”  My family refers to them as sticky chicken because that’s how they turn out.  Deliciously sticky!

This is a great meal for a hot summer night.  I can see myself making extra and then using some sliced cold over some lettuce.  Yum!

Check out Christy’s site and some of her other fantastic recipes.  You won’t be disappointed!