Bored Cook In The Kitchen

Tried and true recipes, new twists on old favorites, and new dishes to expand my family's palate.

Category Archives: Appetizers

Easy Cheese Quesadillas

My children love Cheese Quesadillas.  They love them so much they eat them quicker than I can make them.  By the time I’m throwing the next one in the pan, the first one has already been scarfed down.

Since my pantry is a little bare now, and since I had all the ingredients to make these little delicious noshes, this was on the menu for lunch today.  Trust me when I tell you there were no complaints about that.

This is yet another recipe you can tweak to suit your tastes.  I used shredded cheddar cheese today, but some Monterey jack or a combination of the two ain’t half bad either!  Serve them up with some Pico De Gallo, sour cream, guacamole or some spicy salsa.  Sometimes my kids enjoy them with some taco sauce only.  

Since I’ve lived on a never-ending-supply of Pico De Gallo all summer, and since my children plow through every bowl of it I make, this is what I served it with for lunch with some sour cream on the side.  Perfect!  (Although, if I had some fresh guacamole that would have been even better!)

I cook these up very quickly on the stove in my cast iron pan, and to make it even quicker, instead of using butter, I just use some butter flavored cooking spray.  Works perfectly every time.  If that grosses you out, go ahead and use butter.  Whatever works for you.

Easy Cheese Quesadillas:

  • Flour Tortillas (You can use the taco size for a smaller quesadillas or the buritto size for a larger one)
  • Shredded Cheddar Cheese, Monterey Jack, or both
  • Butter or Butter Flavored Cooking Spray
  • Pico De Gall, Guacamole, Sour Cream, Taco Sauce, Salsa, etc. to top them with.

Begin by heating up your cast iron pan to medium high.  I used butter flavored cooking spray, which I spray into the bottom of the pan.

Lay a tortilla in the pan, cover with some cheese, and top with another tortilla.  Spray the top of that tortilla with cooking spray.

Watch closely because they will burn very quickly if you don’t.  Let the bottom get golden and toasty, then flip and do the same for the other side.

Once done, remove to a cutting board and using a pizza cutter, slice in four pieces.  Serve immediately with  your choice of toppings.

Enjoy!

Add to FacebookAdd to DiggAdd to Del.icio.usAdd to StumbleuponAdd to RedditAdd to BlinklistAdd to TwitterAdd to TechnoratiAdd to Yahoo BuzzAdd to Newsvine

Bernadette’s Texas Caviar

I don’t know the true origins of this dish as I’ve never researched it.  Did it originate in Texas or is that just a name for a dish similar in other areas, but called something different in each region?  I know I’ve had something similar when I was in Mexico, and something similar in my area, and I’ve seen it called everything from Bean Salsa, Bean Caviar, Bean Salad and, of course, Texas Caviar. 

Wherever the name originated from, I’m not concerned.  The only thing that concerns me is that it’s delicious.  Period.

I’ve seen it made with corn, celery, green bell pepper, tomatoes, and a number of other ingredients. 

This version is one friend’s of ours made recently and I just loved it.  If she had a blog I’d send you over to it, but she doesn’t so I can’t.  I did ask her for her recipe and I’ll share that with you today.  I’ve seen recipes for it made with bottled Italian dressing, but was intrigued when she told me she makes her own, which she cooks and than cools.  I think it’s this dressing that makes the difference in her dish.  I can eat it by the bowl, with some tortilla chips, on top of chicken or fish and any other way you can think of .

It’s simple and most definitely even better a day or two after you make it.  You can add to it whatever you like.  

Texas Caviar:

Ingredients:

  • 1 Can Black Beans, drained and rinsed
  • 1 Can Black Eyed Peas, drained and rinsed
  • 1 Red Bell Pepper, chopped
  • 1 Red Onion, chopped
  • 1/3 Cup Olive Oil
  • 1/3 Cup Sugar
  • 1/3 Cup Apple Cider Vinegar

In a small pot, heat the sugar, vinegar and oil.  Bring to a rapid boil and remove from heat.  Allow to cool to room temperature.

In a large bowl add all remaining ingredients.  Pour the cooled vinegar mixture over the top and mix well.  Cover and refrigerate for at least several hours before you plan to serve it or overnight is even better.

Enjoy!

Add to FacebookAdd to DiggAdd to Del.icio.usAdd to StumbleuponAdd to RedditAdd to BlinklistAdd to TwitterAdd to TechnoratiAdd to Yahoo BuzzAdd to Newsvine

Salmon Cakes

On Sunday, my husband grilled some salmon.  I was working so I wasn’t here to enjoy it, but when I got home Monday morning I saw the leftovers in the fridge.

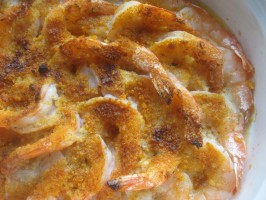
Later that day I was catching up on some Tivo’d episodes of Barefoot Contessa.  I love Ina Garten.  Imagine my surprise when I saw her preparing salmon cakes.  They looked so good!  The best part was that I already had leftover salmon, and pretty much everything else her recipe called for.  So I changed my meal plan for the night from making pasta to making these salmon cakes instead.  I was glad I did because they came out perfect.

I pretty much stuck to her recipe for these, but I did change it up very slightly. Nothing major. 

She shows  you to bake the salmon with some spices on top, but since I already had some grilled salmon, I skipped that part.  And I will say that I think the grilled salmon added a completely different taste since they had that smokey flavor to them.  Definitely a plus.

She also called for red onions, and I used a small Vidalia onion instead.  And red and yellow bell peppers.  I had the red, but not the yellow, so I substituted the green.  I think it added a nice contrast from the sweet of the red bell pepper.  Didn’t add in the capers either, and that was only because I had none left.  My last change was using 2 large eggs versus the 2 extra large eggs she called for.   The large worked just fine.

These are a definite keeper.  I’ll give you Ina’s recipe but you can certainly change it up  however you prefer.  This is an excellent recipe when you have some leftover salmon. 

Salmon Cakes:

Recipe made from Ina Garten’s “Barefoot Contessa”

Serves 4 – 6 (Depending on the size of your cakes)

  • 1/2 pound fresh salmon
  • Good olive oil
  • Kosher salt and freshly ground black pepper
  • 4 tablespoons unsalted butter
  • 3/4 cup small-diced red onion (1 small onion)
  • 1 1/2 cups small-diced celery (4 stalks)
  • 1/2 cup small-diced red bell pepper (1 small pepper)
  • 1/2 cup small-diced yellow bell pepper (1 small pepper)
  • 1/4 cup minced fresh flat-leaf parsley
  • 1 tablespoon capers, drained
  • 1/4 teaspoon hot sauce (recommended: Tabasco)
  • 1/2 teaspoon Worcestershire sauce
  • 1 1/2 teaspoons crab boil seasoning (recommended: Old Bay)
  • 3 slices stale bread, crusts removed
  • 1/2 cup good mayonnaise
  • 2 teaspoons Dijon mustard
  • 2 extra-large eggs, lightly beaten

Directions

Preheat the oven to 350 degrees F.

Place the salmon on a sheet pan, skin side down. Brush with olive oil and sprinkle with salt and pepper. Roast for 15 to 20 minutes, until just cooked. Remove from the oven and cover tightly with aluminum foil. Allow to rest for 10 minutes and refrigerate until cold.

Meanwhile, place 2 tablespoons of the butter, 2 tablespoons olive oil, the onion, celery, red and yellow bell peppers, parsley, capers, hot sauce, Worcestershire sauce, crab boil seasoning, 1/2 teaspoon salt, and 1/2 teaspoon pepper in a large sauté pan over medium-low heat and cook until the vegetables are soft, approximately 15 to 20 minutes. Cool to room temperature.

Break the bread slices in pieces and process the bread in a food processor fitted with a steel blade. You should have about 1 cup of bread crumbs. Place the bread crumbs on a sheet pan and toast in the oven for 5 minutes until lightly browned, tossing occasionally.

Flake the chilled salmon into a large bowl. Add the bread crumbs, mayonnaise, mustard, and eggs. Add the vegetable mixture and mix well. Cover and chill in the refrigerator for 30 minutes. Shape into 10 (2 1/2 to 3-ounce) cakes.

Heat the remaining 2 tablespoons butter and 2 tablespoons olive oil in a large sauté pan over medium heat. In batches, add the salmon cakes and fry for 3 to 4 minutes on each side, until browned. Drain on paper towels; keep them warm in a preheated 250 degree F oven and serve hot.

**Note:  These cakes are very soft when you prepare them.  What I did a little differently to combat this was to place them on a parchment lined cookie sheet in the freezer for about 20 minutes.  Then I fried 4 of them at a time, while keeping the remaining cakes waiting in the freezer until I was ready to fry them up.  This kept them from falling apart on me and worked perfectly.

Add to FacebookAdd to DiggAdd to Del.icio.usAdd to StumbleuponAdd to RedditAdd to BlinklistAdd to TwitterAdd to TechnoratiAdd to Yahoo BuzzAdd to Newsvine

Smooth Salsa

Salsa is one of my most favorite things to eat.  And the greatest thing about it is it’s good for you and it’s fat-free. 

You can put it on anything, rice, chicken, beans, salads, or just dip some chips and chow down. 

If I’m running out of ideas on what to eat I’ll grill some chicken breasts and spread this over the top.  Doesn’t get any better.

I’m not a fan of chunky salsa, nor am I fan of jarred salsa.  I’ll eat it from a jar, but it’s that bowl of fresh salsa they put in front of you in restaurants that make you forget all about the dinner you ordered while you devour it with some chips.  Not that I do that…but someone may.

This is super simple to make and another very versatile recipe.  You can change it up and add to it whatever you have or want.  Make it chunky or smooth.  It’s all up to you. 

Smooth Salsa:

  • 28 oz. Can Sweet Plum Tomatoes, drained
  •  7 oz.  Can Salsa Verde **See Note
  • 1 Jalapeno Pepper, seeded or unseeded and sliced
  • 1 Cup Fresh Cilantro
  • 2 Cloves Fresh Garlic
  • 1 Medium Onion, quartered
  • 1 Fresh Lime
  • 1 tsp. Sugar
  • 1 tsp. Cumin

**Note:  I used Herdez Salsa Verde.  You can find this in the ethnic section of your grocery store.  It’s a smooth green sauce made from tomatillos, onions, and serrano peppers.   

In a food processor add all ingredients and pulse until you reach the consistency you want.  For me, it’s smooth, but you can work it whatever way you like.

Once well blended taste and add any additional seasonings as needed.

Place in an airtight container in the refrigerator and allow to chill for a few hours.

Serve with chips, mix into dips or guacamole, serve on grilled chicken, whatever you got!

Cheeseburger Pizza Bread

My husband made a few too many cheeseburgers for the kids on Sunday, so I ended up with about 4 medium-sized grilled burgers leftover. 

Leftover burgers don’t really do it for me, so I wasn’t sure what to do with them.  Then I remembered I also had a pound of pizza dough leftover from my son’s pizza making dinner from Saturday, along with tomato sauce and cheese.  All things combined made for a super easy and delicious dinner.

Cheeseburger Pizza Bread:

Serves: 6

  • 1 lb. Pizza Dough (Mine was made fresh from the store)
  • 4 Medium sized cooked cheeseburgers, cooled and broken up
  • 1 1/2 Cups Pizza or Tomato Sauce
  • 1 Cup Shredded Cheese (I used Mozzarella)
  • 2 tsp. Grated Parmesan Cheese
  • 1 Egg, beaten

Begin by heating the oven to 450 degrees.

In a large bowl, crumble up the cooked and cooled cheeseburgers.  Add the tomato sauce, grated cheese and parmesan.  Stir to combine.

Roll out and stretch your pizza dough to about 15″ L x 12″ W.  Fill with the meat and cheese mixture, keeping the mixture towards the center. 

Fold your sides and ends over and in and pinch well together. 

Spray a large cookie sheet with cooking spray and gently place the pizza dough on top. 

In a small bowl, whisk the egg and brush on the outside of the dough, covering all sides and the top.

Place in the center of your oven and cook for about 15 to 20 minutes, being sure to check the dough so it doesn’t burn.   Your want the outside nicely crisp and browned.

Once done, remove from oven and allow to rest for about 15 minutes.  Slide the dough on a cutting board and slice into 2 to 3 inch slices with a serrated knife. 

We ate this with a salad and that was it.  The kids love it and it was filling enough for a main dish for dinner.